Friday 22 May 2015

Here’s a Trick for Adjusting Past +/- 100 in Lightroom and Adobe Camera Raw

Source:

http://petapixel.com/2015/05/18/heres-a-trick-for-adjusting-past-100-in-lightroom-and-adobe-camera-raw/

before
In this post, I’ll share a trick I use to get some adjustments “beyond” +100 or -100 in Lightroom and Adobe Camera Raw.
In the screenshot above, I like how most of the image looks — the bird and the branches are well exposed, at least. But the blue sky got blown out to almost pure white. I already moved the Highlights slider down to -100 and it’s still pretty white. I want to go past -100.

So grab the graduated filter tool — the G key or the button that looks like a vertical gradient in the row of buttons along the top. The sliders on the right change to the various things your filter can affect: highlights, shadows, sharpness, etc.
graduated
Right click on the minus icon to the left of the highlights slider. By right clicking, I not only move the highlights slider down, I also reset all other sliders to their default position. I then drag highlights all the way to -100.
Now I apply the filter by clicking very close to the bottom right corner, and then dragging the gradient diagonally off the bottom right corner of the image. There’s nothing special about the bottom right, the idea is just to start near an edge/corner, and finish just outside of that same edge/corner. That way the gradient crosses the entire image, and is at full intensity all the way through. The pink here is just a preview mask to show what part of the image is being covered… as you can see, it’s affecting everything evenly.
mid
So now you should see the highlights drop a bit more than before. The -100 from the graduated filter, stacks with the existing -100 setting, to effectively give you -200 highlights. If that’s still not enough, you can just right click on the gradient’s starting point, and choose “duplicate”. Then you’ll pull down highlights even further. I repeated 2 or 3 times until I felt like highlights had been darkened enough.
after
The sky is a realistic blue again!
You can do this same trick to stack up almost anything past 100… clarity, sharpness, shadows, noise reduction, etc. Enjoy!

Tuesday 19 May 2015

What is Reciprocal Rule in Photography?

Source:https://photographylife.com/what-is-reciprocal-rule-in-photography 

What is Reciprocal Rule in Photography?

One of the biggest challenges that many photographers face is yielding sharp photos when hand-holding a camera. Many end up with blurry images without understanding the source of the problem, which is usually camera shake. Unfortunately, camera shake can come from a variety of different sources – from basic improper hand-holding techniques to mirror and shutter-induced vibrations that can be truly challenging and sometimes even impossible to deal with. While I will go over the latter topics in a separate article, I would like to talk about the most common cause of camera shake: lower-than-acceptable shutter speed when hand-holding the camera. I will introduce and explain the reciprocal rule, which can help in greatly increasing the chances of getting sharp photos when you do not have a tripod around.

Sony A7R Image Sample (12)
Captured hand-held following reciprocal rule
Sony A7R + FE 35mm f/2.8 ZA @ 35mm, ISO 100, 1/40, f/11

What is Reciprocal Rule?

Due to the fact that we as humans cannot be completely still, particularly when hand-holding an object like a camera, the movements caused by our bodies can cause camera shake and introduce blur to images. The basic premise of the reciprocal rule is that the shutter speed of your camera should be at least the reciprocal of the effective focal length of the lens. If you are confused by what this means, don’t worry – it is really easy to understand once you see it in an example.
Say you are shooting with a zoom lens like the Nikkor 80-400mm f/4.5-5.6G VR (see our in-depth review) on a full-frame camera like the Nikon D750 (in-depth review). All the rule is stating, is that if you are shooting at 80mm, your shutter speed should be set to at least 1/80th of a second, whereas if you zoom in to say 400mm, your shutter speed should be at least 1/400th of a second. Using such fast shutter speeds should prevent blur by camera shake. Why? Because there is a direct correlation between focal length and camera shake – the longer the focal length, the more potential there is for camera shake. If you have a long telephoto zoom lens like the above-mentioned 80-400mm lens, you have probably already noticed how much more shaky and jumpy your viewfinder looks when you are zoomed in to the longest focal length, compared to the shortest one – that’s because camera movement is magnified at longer focal lengths:
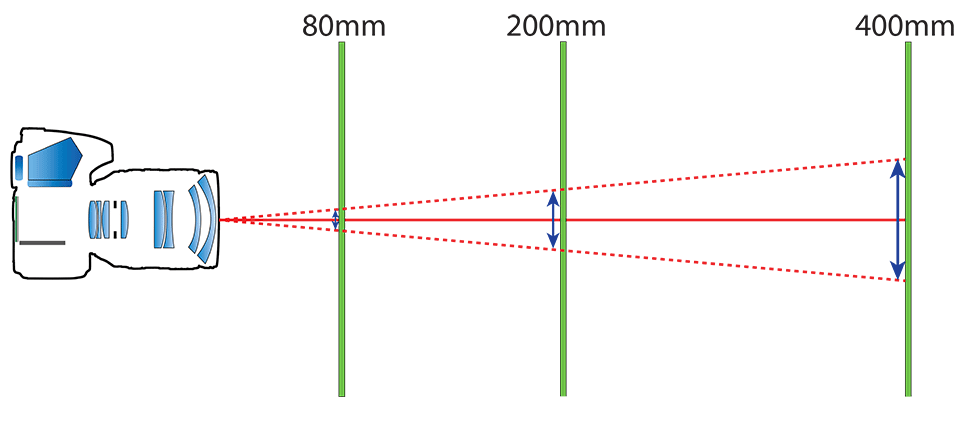
Focal Length and Camera Shake
You can see how the potential for camera shake is increased with the increase in focal length. The red-dotted lines that represent the potential limit of how much the camera can shake when hand-held have a much shorter span at 80mm than at 400mm. That’s because camera shake is magnified with increase in focal length.

Camera Shake Blur is NOT Motion Blur

It is important to point out that blur caused by camera shake is very different than motion blur (where subject is faster than set shutter speed) – it usually has the whole image blurred, whereas motion blur might only have the subject, or a portion of the subject appear blurred, while the rest of the image appears sharp. It is also important to point out that the reciprocal rule only applies when hand-holding a camera – mounting your camera on a stable object like a tripod will not require such fast shutter speeds.

Effective Focal Length

Please note that I used the word “effective focal length” in the definition and gave you an example with a full-frame camera. If you have a camera with a smaller sensor than 35mm / full-fame, (and most entry-level DSLRs and mirrorless cameras have smaller sensors), you first have to compute the effective focal length, also known as “equivalent field of view”, by multiplying the focal length by the crop factor. So if you use the same 80-400mm lens on a Nikon DX camera with a 1.5x crop factor and you are shooting at 400mm, your minimum shutter speed should be at least 1/600th of a second (400 x 1.5 = 600).

Notes and Exceptions

Although it is commonly referred to as “reciprocal rule”, it is not a rule per se – just a guidance for minimum shutter speed to avoid blur caused by camera shake. In reality, how shutter speed affects camera shake depends on a number of different variables, including:
  • The efficiency of your hand-holding technique: if you have a poor hand-holding technique, the reciprocal rule might not work for you and you might need to use faster shutter speeds. Gear and lenses vary in size, weight and bulk, so you might need to utilize specialized hand-holding techniques depending on what you are shooting. For example, check out this great article by Tom Stirr on hand-holding techniques for telephoto lenses.
  • Camera resolution: whether we like it or not, digital cameras are increasing in resolution and as we have seen in the case of high-resolution cameras like Nikon D810, having more pixels crammed into the same physical space can have a drastic effect on how sharp images turn out at 100% zoom. Higher resolution cameras will show more intolerance to camera shake than their lower resolution counterparts. So if you are dealing with a high resolution camera, you might need to increase your shutter speed to a higher value than what the reciprocal rule suggests.
  • Lens quality / sharpness: you might have a high resolution camera, but if it is not matched by a high-performing lens with great sharpness, you will not be able to yield sharp images, no matter how fast your shutter speed is.
  • Subject size and distance: photographing a tiny bird from a long distance and wanting to have every feather detail preserved usually requires faster shutter speed than recommended by the reciprocal rule, especially if the subject needs to be tack sharp at 100% zoom (pixel-level).
  • Image stabilization: is a major factor and should be explained separately – see below.

Image Stabilization

Reciprocal rule falls apart if your lens or your camera come with image stabilization (also known as “vibration reduction” or “vibration compensation”), because it effectively reduces camera shake by moving internal components of a lens or the sensor of the camera. Since the implementation and the effectiveness of image stabilization depend on a number of factors including manufacturer technology, lens vs in-camera image stabilization, effective use of stabilization technology and other factors, its impact varies greatly from camera to camera and lens to lens. For example, Nikon and Canon both use lens stabilization and usually claim between 2-4 times of compensation potential on lenses, whereas Olympus claims up to 5 times of compensation on its OM-D E-M1 mirrorless camera with 5-axis in-body image stabilization system. That’s a pretty big potential for reducing shutter speed to numbers way below what the reciprocal rule would recommend.
In the above example with the Nikkor 80-400mm f/4.5-5.6G VR, since the lens comes with image stabilization and Nikon claims up to 4 stops of compensation, you could theoretically reduce the recommended shutter speed by reciprocal rule by up to 16 times! So when shooting at 400mm, if your hand-holding technique was perfect and you turned image stabilization on, you could go from 1/400th of a second (reciprocal rule based on a full-frame camera) to 1/25th of second and still be able to capture a sharp image of your subject (provided that your subject does not move at such long shutter speeds and cause motion blur). In such cases, reciprocal rule simply does not apply…

Applying Reciprocal Rule: Auto ISO

Many of the modern digital cameras come with a really neat feature called “Auto ISO”, which allows one to let the camera control camera ISO depending on light conditions. Some Auto ISO implementations are rather simplistic, letting the end-user specify only minimum and maximum ISO and giving little to no control on minimum shutter speed. Others will have more advanced Auto ISO features, allowing to specify not only ISO ceilings, but also what the minimum shutter speed should be before ISO is changed. Nikon and Canon, for example, have one of the best Auto ISO capabilities in their modern DSLRs – in addition to the above, minimum shutter speed can be set to “Auto”, which will automatically set the shutter speed based on the reciprocal rule:
Nikon Auto ISO Sensitivity Settings
One can even customize this behavior further, by decreasing or increasing the minimum shutter speed relative to the reciprocal rule. For example, on my Nikon D750 I can set minimum shutter speed to “Auto”, then set the bar once towards “Faster”, which will double the shutter speed based on the reciprocal rule. So if I am shooting at say 100mm focal length, the camera will automatically increase ISO only when my shutter speed drops below 1/200th of a second. And if I use a stabilized lens and want my camera to have a longer minimum shutter speed, I can move the same bar towards “Slower”, reducing the minimum shutter speed guided by the reciprocal rule.

You Ain’t No Photographer If You Don’t Know How To Do This

Source:

http://www.wix.com/blog/2015/05/you-aint-no-photographer-if-you-dont-know-how-to-do-this/?utm_source=Wix+Blog&utm_campaign=eb7ca0f19a-UA-2117194-5&utm_medium=email&utm_term=0_324de5e2c6-eb7ca0f19a-137923649

You Ain’t No Photographer If You Don’t Know How To Do This

May 18th 2015 | Photography
Who doesn’t have a camera nowadays? All smartphones nowadays boast decent to awesome cameras, which turns most mobile phone owners into passionate amateur photographers.
However, if you want to be able to rise to the top of amateur photographers, instinct alone won’t cut it. Photography is a challenging craft that cannot exist outside the laws of physics and requires extensive knowledge of lighting, exposure, color and camera function. You don’t have to be the next Annie Leibovitz, but if you have aspirations of becoming a better photographer, make sure you master every item on the following list.

You Ain’t No Photographer If You Don’t Know This

Learn Lenses:

Lenses are so much more than a tool for increasing the zoom-in option. Using different lenses results in radically different photographs! Understanding the basic technology behind lenses is important for predicting the type of image that a lens can produce for you. The focal length, the aperture and the field of view – all of these are terms you should get comfortable with if you want your camera lens to give you maximum performance.
Learn Lenses

Figure Out Exposure:

Key issue! Exposure basically means how much light is collected in your camera in the instant of taking a photo. The amount of light can have a huge impact on the photo’s appearance – too much light gives you a burnt out photo; too little means darkness. The good news is that you have full control over the matter. Through a combination of aperture settings, ISO speed and shutter speed (yes, these are words that you must know) you can determine how much exposure your shot gets.

Lights Lights Lights!

Photography lighting is quite complex. There are many different factors to take into account in finding the best type and quality of lighting: Hard or soft, natural or unnatural, the spectrum of colors, the direction of the light and more. If you want to take photos like a pro, you need to be able to predict how light will impact your shots. If you understand light, you’ll be able to make it work for you and produce greater images.
Photography is all about the lights

The Science of Reflectors:

Wanna show light who’s boss? This is where reflectors come in. Using reflectors on light sources helps you determine the direction and strength with which light enters your frame. The size, location, color and shape of the reflector all influence the quality of light you end up with. One great method for mastering the physics of reflectors is to experiment with making them yourself. Not only will it make you a better photographer, it will also save you quite a bit of money.

Camera Positioning:

Perspective is an immensely important element in composition. You need to be able to make conscious decisions on how you position your camera in relation to the photo subject and to know the strengths and weaknesses of different angles. On the technical level, remember that you can use accessories to get accurate positioning, but also be sure to be creative and use your immediate environment to get just the right angle.
Camera Positioning

White Balance:

Ever noticed how the colors in the photos you take don’t really resemble the way they appear in real life? That’s because you’re neglecting white balance! This key aspect of photography makes sure that the color temperature of your photo is well balanced so that the colors appear as accurate as possible. Most digital cameras have automatic white balance settings that will do the work most of the time, but as an aspiring photographer you should try to learn how to manually adjust white balance for different types of photos.

Focus Control:

Controlling the level of focus is a technique that separate real photographers from amateurs. What most beginners don’t realize is that you don’t need an expensive and sophisticated lens in order to stay in focus. What you do need is to know your lens and its abilities well, and to calculate your moves based on the focal length (the distance between the subject of the photo and your camera lens). Knowledge is power!
Focus Control

The Rule of Thirds:

This one requires a bit of basic mathematics. If the shot you’re taking is split into vertical and horizontal thirds, the meeting points between the the dividing lines are the most important spots in the frame, and therefore your subject would ideally be located close to one of the four meeting points.

Framing It Right:

Framing is meant to highlight the subject of the photo by placing it within a visual framework – a shop window, a group of people, a corner of the room, and any other type of visual boundary that creates context. Different framings can emphasize different aspects of your subject, so you should consider framing as a key method in determining the overall composition.
Framing It Right

Basic Post Editing:

Even if you ideologically oppose digital editing, as a photographer you will at some point be required to do slight adjustments and enhancements. It won’t compromise the quality of your work. On the contrary, it will help you improve your technique and train your eye. The most basic editing actions you should experiment with are color enhancements, exposure adjustment, sharpening and cropping for composition improvement.

Thursday 7 May 2015

An Interview with Henri Cartier-Bresson from 1958

Source :http://petapixel.com/2015/05/03/an-interview-with-henri-cartier-bresson-from-1958

/http://petapixel.com/2015/05/03/an-interview-with-henri-cartier-bresson-from-1958/

 
A couple of months ago, we shared an interview with the photographer known as Weegee that was released in the 1958 vinyl record titled “Famous Photographers Tell How.” On that same record is an interview with Henri Cartier-Bresson in which the legendary photojournalist shares his thoughts on what photography is, the way he approaches it, and various opinions on theory and technique.
Below is a text version of the whole interview, meticulously transcribed by photographer Erica McDonald:


Henri Cartier-Bresson: To me, photography is a simultaneous recognition in a fraction of a second of a significance of an event as well as of a precise organization of form which gives that event its proper expression. I believe that, for reactive living, the discovery of oneself is made concurrently with the discovery of the world around us, which can mold us, but which can also be affected by us. A balance must be established between these two worlds: the one inside us, and the one outside us. As the result of a constant reciprocal process, both these worlds come to form a single one. And it is this world that we must communicate.
But this takes care only of a content of a picture. For me, content cannot be separated from form. By form, I mean a rigorous geometrical organization of interplay of surfaces, lines and values. It is in this organization alone, that our conceptions and emotions become concrete and communicable. In photography, visual organization can stem only from a developed instinct.
First I would like to say that it is only a rule I established in myself, a certain discipline, but it is not a school, it’s not a…it’s very personal. And I think that we cannot separate what we have to say from the way we have to say it, how to speak.
Photography is in a way a mental process. We have to know what to, be clear, on what we want to say. Our conceptions, our, what we think of a certain situation, a certain problem. Photography is a way of writing it, of drawing, making sketches of it. And in the form, things are offered to us in daily life. We have to be alert and know when to pick the moment which is significant. Then, it’s just intuition. It’s instinct. We don’t know why, we press at a certain moment. It comes, it is there, it’s given. Take it. Everything is there, it is a question of chance, but you have to pick and force chance to come to you. There’s a certain will.
The creative part of photography is very short. A painter can elaborate, a writer can, but as it’s given, we have to pick that moment, the decisive moment, it is there. Ah! I’ve seen this. I’ve been there. I’ve seen that.
When I started photography in 1930 there were hardly any picture magazines, there was no market. And I was taking pictures of things that struck me, interested me. I was keeping a kind of diary. And I still do keep a photography diary. And later, there were magazines, and working for magazines, you have to work for yourself, always for yourself, you express yourself. With magazines, they put you into contact with events important in the world, and you have a possibility of speaking to a very large audience.
Interviewer: Does that in any way affect your attitude toward a story when you’re working for a large audience? Or do you still follow your own precepts, it’s still the same intuition in a way?
It is the same intuition. You have to know in which framework you have to tell your story for the magazine, but you must not work for the magazine. You work for yourself, and the story.
Of course you are communicating. For example, you’ve made various photographic essays on different countries. When you come into a country do you live there for some time? Do you try to feel the…
You can’t rush in and out. It takes time to understand, to have a feeling of a place. You have a general idea of a country, but when you get there, you realize that your preconceived idea was right or wrong, but you mustn’t push the preconceived idea you had. No, reality speaks, and your impressions. And it’s very important, the first impression has to be very fresh – just like when you see the face of somebody for the first time, you have a feeling. Maybe after, you say, oh, I was wrong. Because I didn’t take notice of certain things, a certain smile, something, and a country is the same thing.
I wonder if you could possibly give an example. For example, your work on India. Which we in the West have some sort of exotic preconceptions about. Was that changed quite a bit when you first got there, and did that affect your work and your approach to the people?
It’s a thing that comes through your system little by little, it’s not sudden. It can be sudden… you have to live there, you have to know people, you have to establish relations, you have to be on the same level with people. You can’t come as a judge and uh, you have to get close to people, you have to be warm. You have to like people. You mustn’t be cruel, you mustn’t be hard, you mustn’t be tough, because it bounces back on yourself. You can express all that you feel, you can be shocked, you can be humorous, you can be less tender, all the sentiments you can express.
And that’s all there in your attitude, it shows up in what you pick, I suppose. Well, in your approach, do you take many pictures, for example, of one incident or subject, or do you wait perhaps for that…
It depends, there’s no rule, there’s no…it depends, it depends. You have to be subtle and supple at the same time. Fit, exactly.
You’ve been known for never cropping your photos. Do you want to say anything about that?
About cropping? Uh, I said in that forward, we have to have a feeling for the geometry of the relation of shapes, like in any plastic medium. And I think that you place yourself in time, we’re dealing with time, and with space. Just like you pick a right moment in an expression, you pick your right spot, also. I will get closer, or further, there’s an emphasis on the subject, and if the relations, the interplay of lines is correct, well, it is there. If it’s not correct it’s not by cropping in the darkroom and making all sorts of tricks that you improve it. If a picture is mediocre, well it remains mediocre. The thing is done, once for all.
Well I guess that goes back to your intuition. It has to be there, completely.
Yes. And for technique, technique is not a thing in the abstract. You can’t evade it. The technique has to be something to express what you want to say. You have to master your own technique, to know your tools to say what you have to say. Technique doesn’t exist in the (abstract)…you have to know your lenses, but it’s not that difficult. You learn it very quickly. It’s like a typist mustn’t look at his keyboard, and then he types. But then, when he knows how to type he’s concerned only with what he has to say, it’s the same thing. You mustn’t use a light meter, you have to know exactly what, to weigh the light. A cook doesn’t take a scale to know how much salt you should put in a cake. The salt you put to give, to enhance the sugar. It’s intuition, it’s instinctive, and it’s the same thing.
I think that applies to all forms of expression, the technique has to be completely assimilated.
I think so. Yes.
Now, for example as a photographer, you yourself, the basic thing you want to do is communicate, I suppose like any artist in any field.
Yes, communication has been an important thing. You want to give something, and to know that it is accepted. It’s not recognition. Recognition…in a way, success is dangerous. Success can affect us.
In what way, you mean…
Success is in a way as unjust as lack of success. What is important (becomes the recognition.) You want to give something to know that somebody will accept it. In fact, when you love somebody, somebody will not turn you down, your love is accepted. And this is communication to me. To give something which is.
To give and then be requited.
Yes. And not recognition.
I wonder if you can talk about some technical aspects of photography.
We don’t need very big equipment. Practically I work all the time with a 50 mm, a very wide open lens, because I never know if I’m going to be in a dark room taking a picture in this moment and outside in full bright sun the next moment. So…
The compactness has become very important. Small cameras…
It is very important. And people don’t notice you so much.
In the old days when they had colloidal plates and whatnot.
I think with the 50mm you can cover a large number of things. Sometimes, especially for landscape, you need a 90 mm because it cuts all the foreground which is not that interesting. But this you don’t decide beforehand…I’m going to work with such a lens…no. It depends on the subject. The subject guides you, it’s there. Your frame, you see it, it’s a recognition of a certain geometrical order, as well as of the subject.
It’s a question sometimes people put. “Which is your favorite picture?” And I must say the important picture is the next one you’re going to take. We’re not curators of our work. The important is to think about the next subject. Photography is a way of living. To me, my camera is an extension of my eye. I keep it all the time with me. But, everything depends on the way we live, what we like and our attitude toward life. What we are, in fact.